🚀 How to Apply YAML Configurations Using kubectl in Terminal
In this blog post, I'll show you how to correctly paste and apply a YAML configuration into your terminal using kubectl. It's an easy and efficient method using the cat command with a here document (<<EOF). Let’s dive in! 🎉
📋 Step-by-Step Guide
1️⃣ Copy the YAML Configuration
Here’s a sample YAML configuration for creating an Elasticsearch resource:
apiVersion: elasticsearch.k8s.elastic.co/v1
kind: Elasticsearch
metadata:
name: quickstart
namespace: elasticsearch
spec:
version: 7.10.0
nodeSets:
- name: default
count: 1
config:
node.store.allow_mmap: false
2️⃣ Paste the Configuration in Terminal
Use the cat command with a here document to apply this YAML configuration directly in your terminal. Here's how:
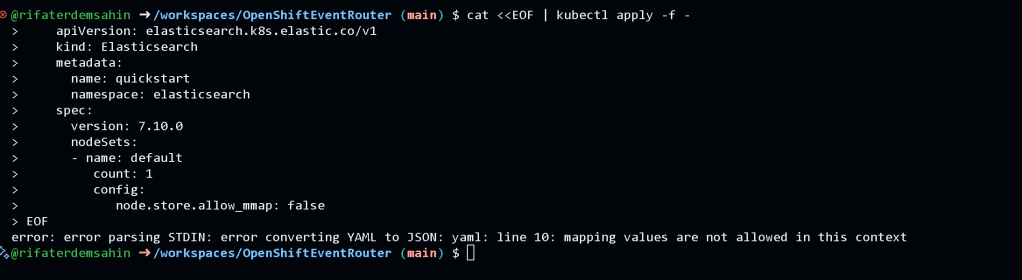
@rifaterdemsahin ➜ /workspaces/OpenShiftEventRouter (main) $ cat <<EOF | kubectl apply -f -
apiVersion: elasticsearch.k8s.elastic.co/v1
kind: Elasticsearch
metadata:
name: quickstart
namespace: elasticsearch
spec:
version: 7.10.0
nodeSets:
- name: default
count: 1
config:
node.store.allow_mmap: false
EOF
@rifaterdemsahin ➜ /workspaces/OpenShiftEventRouter (main) $
3️⃣ Run the Command
Once pasted, press Enter, and the configuration will be applied to your Kubernetes cluster. This will create the Elasticsearch resource as defined in the YAML.
✨ Key Tips
-
🔒 Ensure you have the necessary permissions to apply resources in your Kubernetes cluster.
-
⚙️ Verify that your
kubectlis configured and pointing to the correct cluster (kubectl config viewis your friend!). -
🚦 Validate the creation using
kubectl get elasticsearch -n elasticsearch.
👉 Before applying:
📸 Take a screenshot of your terminal right after pasting the command to verify your configuration.
👉 After applying:
📸 Capture the output from kubectl get commands to confirm the resource has been created successfully.
💡 Why Use cat <<EOF?
-
🛠️ Convenience: Paste and apply YAML configurations without creating temporary files.
-
🚀 Efficiency: Reduces steps, keeping everything in your terminal.
-
🎯 Portability: Easily share and execute configurations in collaborative environments.
🔗 Connect with me:
💼 LinkedIn
🐦 Twitter
🎥 YouTube
💻 GitHub
📣 Let me know how this guide helped you! 🌟
Imported from rifaterdemsahin.com · 2025