Backing Up CRC OpenShift to Another Drive Using Hyper-V Export
Backing Up CRC OpenShift to Another Drive Using Hyper-V Export
If you're running CRC OpenShift on a virtual machine (VM) using Hyper-V, you may need to back up your setup to another drive for safekeeping or migration purposes. This blog post will guide you through the steps of exporting your CRC OpenShift VM using Hyper-V to another drive, ensuring that your environment is securely backed up.
Why Backup Your CRC OpenShift?
Backing up your CRC (CodeReady Containers) OpenShift setup is essential for several reasons:
-
Data Safety: Protect against data loss due to hardware failure or accidental deletion.
-
Migration: Easily move your VM to a different server or storage location.
-
Testing: Create a backup before testing new configurations or updates.
Steps to Backup CRC OpenShift on Hyper-V
1. Preparing for the Backup
Before you start the backup process, ensure the following:
-
You have sufficient space on the destination drive where you want to export your VM.
-
The VM (crc in this case) is in the 'Off' state to avoid inconsistencies during the export.
2. Open Hyper-V Manager
-
Open Hyper-V Manager from the Start menu or by searching for it.
-
In the Hyper-V Manager, select the host machine (e.g.,
W11V3...).
3. Select the VM to Export
-
In the Virtual Machines pane, locate your CRC VM (
crcin this example). -
Ensure the VM state is 'Off'. If it isn't, right-click the VM and select Turn Off to shut it down gracefully.
4. Start the Export Process
-
Right-click on the
crcVM and select Export… from the context menu. -
A dialog box will appear, prompting you to choose the destination folder for the export.
5. Choose Export Destination
-
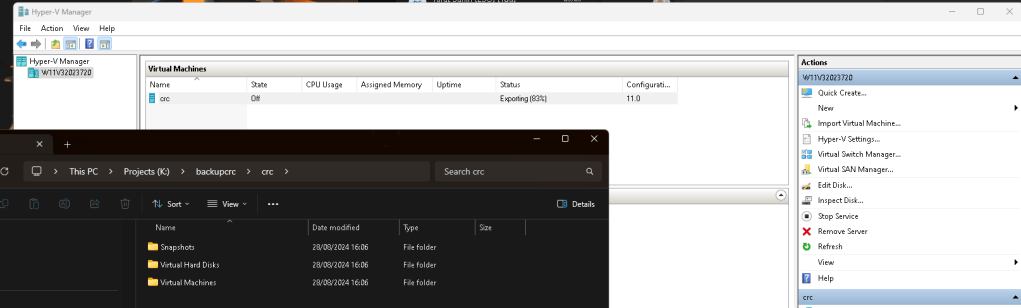
Navigate to the drive and folder where you want to back up your VM. In the screenshot, this appears to be a folder named
backupcrcon theK:drive. -
Select or create a new folder where you want the backup to be stored. Ensure this location has enough space for the entire VM, including its virtual hard disks and snapshots.
6. Monitor the Export Progress
-
Once the export starts, you'll see the status update under the 'Status' column next to your VM. The status will indicate the progress, for example,
Exporting (83%). -
Wait for the export process to complete. This can take some time depending on the size of the VM and the speed of your storage.
7. Verify the Backup
-
Navigate to the destination folder on the new drive where you exported the VM.
-
Ensure all files, including snapshots, virtual hard disks, and VM configuration files, are present.
8. Final Thoughts
Once the export is complete, you have successfully backed up your CRC OpenShift VM to another drive using Hyper-V. This process is crucial for maintaining a secure and recoverable OpenShift environment, whether for data safety, migration, or testing purposes.
By regularly backing up your VM, you can avoid data loss and ensure a quick recovery in case of any issues. Remember, keeping backups up to date is just as important as creating them, so schedule regular backups as part of your maintenance routine.
Happy backing up!
🔗 Connect with me:
-
💼 LinkedIn: https://www.linkedin.com/in/rifaterdemsahin/
-
🐦 Twitter: https://x.com/rifaterdemsahin
-
🎥 YouTube: https://www.youtube.com/@RifatErdemSahin
-
💻 GitHub: https://github.com/rifaterdemsahin
Imported from rifaterdemsahin.com · 2025