Streamline Your OpenShift Deployments with Environment Variables
Deploying applications on OpenShift offers a robust and flexible way to manage your containerized workloads. However, configuring environment variables correctly is crucial for ensuring your application behaves as expected across different environments. In this blog post, we'll walk through how to set up environment variables for your OpenShift deployments using YAML configuration files.
Why Environment Variables Matter
Environment variables play a vital role in configuring your application without hardcoding values directly into your code. This practice enhances security, portability, and manageability. Whether you're connecting to a database, configuring API keys, or toggling feature flags, environment variables are the go-to solution.
Step-by-Step Guide to Setting Environment Variables in OpenShift
1. Creating the DeploymentConfig YAML File
In OpenShift, you can define environment variables within the env section of a DeploymentConfig or Deployment resource. Here’s an example:
apiVersion: apps.openshift.io/v1
kind: DeploymentConfig
metadata:
name: my-app
namespace: my-namespace
spec:
replicas: 1
selector:
app: my-app
template:
metadata:
labels:
app: my-app
spec:
containers:
- name: my-container
image: my-image:latest
env:
- name: ENV_VAR_1
value: "value1"
- name: ENV_VAR_2
value: "value2"
- name: ENV_VAR_3
value: "value3"
ports:
- containerPort: 8080
triggers:
- type: ConfigChange
- type: ImageChange
imageChangeParams:
automatic: true
containerNames:
- my-container
from:
kind: ImageStreamTag
name: my-image:latest
Replace placeholders like my-app, my-namespace, my-container, and my-image with your actual values. Define your environment variables under the env section.
2. Applying the Configuration
Once you've created your YAML file, save it as deployment-config.yaml. Apply this configuration to your OpenShift cluster using the oc command-line tool:
oc apply -f deployment-config.yaml
3. Advanced Example with Secrets
For sensitive information such as database credentials or API keys, it's best practice to use Kubernetes Secrets. Here's how you can reference a secret in your environment variables:
apiVersion: apps/v1
kind: Deployment
metadata:
name: my-app-deployment
namespace: my-namespace
spec:
replicas: 1
selector:
matchLabels:
app: my-app
template:
metadata:
labels:
app: my-app
spec:
containers:
- name: my-app-container
image: my-app-image:latest
env:
- name: DATABASE_URL
value: "postgres://user:password@hostname:5432/dbname"
- name: REDIS_URL
value: "redis://hostname:6379"
- name: API_KEY
valueFrom:
secretKeyRef:
name: my-secret
key: api-key
ports:
- containerPort: 8080
In this example, the API_KEY environment variable is sourced from a Kubernetes Secret.
4. Ensuring Secure and Manageable Configurations
Here are some tips to ensure your environment variables are managed securely and effectively:
-
Use Secrets for Sensitive Data: Always use Kubernetes Secrets for sensitive data such as passwords, tokens, and keys.
-
Namespace Management: Keep your environment variables organized by using namespaces effectively.
-
Configuration as Code: Maintain your configurations in a version-controlled repository to track changes and facilitate collaboration.
Conclusion
Configuring environment variables in OpenShift is a fundamental step for deploying robust and secure applications. By following best practices and leveraging Kubernetes features, you can streamline your deployments and ensure your applications are flexible and manageable across different environments.
Do you have any tips or questions about managing environment variables in OpenShift? Share your thoughts in the comments below!
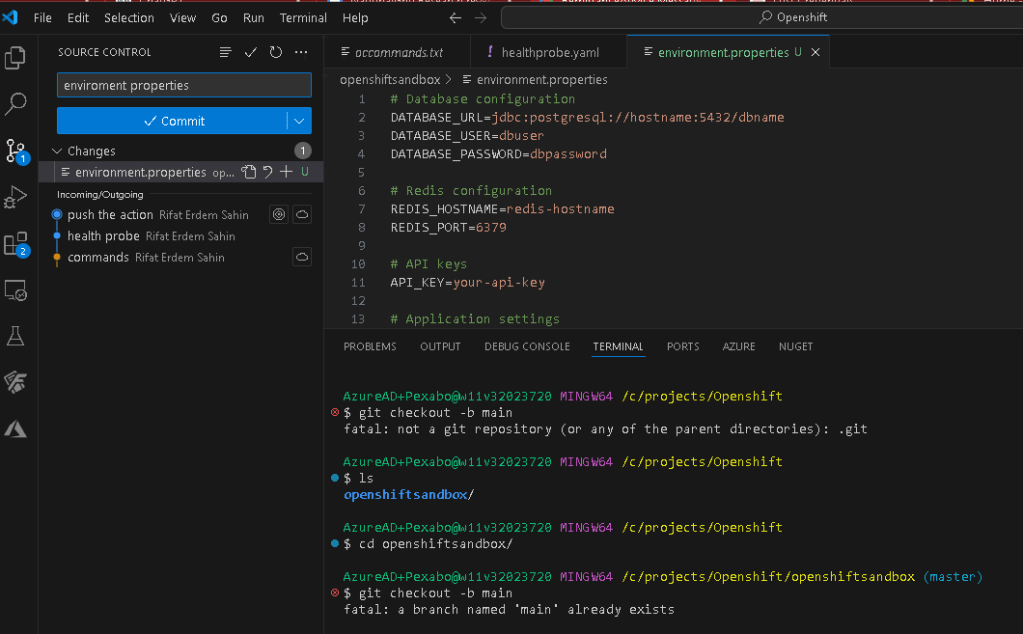
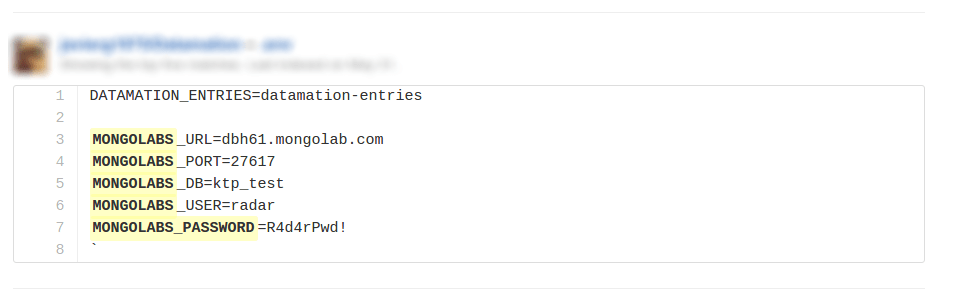
what an environment.properties file might look like. This file format is commonly used in Java applications for configuration purposes.
Database configuration
DATABASE_URL=jdbc:postgresql://hostname:5432/dbname
DATABASE_USER=dbuser
DATABASE_PASSWORD=dbpassword
Redis configuration
REDIS_HOSTNAME=redis-hostname
REDIS_PORT=6379
API keys
API_KEY=your-api-key
Application settings
APP_ENV=production
LOG_LEVEL=info
MAX_CONNECTIONS=100
Custom settings
CUSTOM_SETTING_1=value1
CUSTOM_SETTING_2=value2
Other configuration
FEATURE_FLAG=true
TIMEOUT=30
Explanation:
-
DATABASE_URL: Connection URL for the database.
-
DATABASE_USER: Username for the database.
-
DATABASE_PASSWORD: Password for the database.
-
REDIS_HOSTNAME: Hostname for the Redis server.
-
REDIS_PORT: Port number for the Redis server.
-
API_KEY: API key for external services.
-
APP_ENV: Environment in which the application is running (e.g., development, staging, production).
-
LOG_LEVEL: Level of logging detail (e.g., debug, info, warn, error).
-
MAX_CONNECTIONS: Maximum number of database connections.
-
CUSTOM_SETTING_1 and CUSTOM_SETTING_2: Example of custom settings.
-
FEATURE_FLAG: Toggle features on or off.
-
TIMEOUT: Example of a timeout setting in seconds.
Creating the File
To create this file, you can use any text editor:
-
Open your preferred text editor (e.g., Notepad, VSCode, Sublime Text).
-
Copy and paste the content above into the editor.
-
Save the file with the name
environment.properties.
This file can then be used by your application to load these environment variables at runtime. Ensure that sensitive information like DATABASE_PASSWORD and API_KEY is managed securely and not exposed in version control systems.
Imported from rifaterdemsahin.com · 2024