How to Use VDO.Ninja for a Multi-View Screen Share Session: Top-Down, Screen, and Face Cam
VDO.Ninja is a powerful browser-based tool that lets you create live streaming sessions with multiple guests, share screens, and set up dynamic video layouts. In this post, we'll walk through how to set up a session that uses three key views: a top-down camera for hands-on work, a screen share for digital tasks, and a face cam for personal interaction. This setup is perfect for online teaching, demos, or collaborative work.
Step 1: Setting Up the Room
First, create your VDO.Ninja room by heading to the VDO.Ninja homepage. You’ll want to create a custom room link to invite your guests and capture your own video feeds.
-
Create a Room: Click on Create a Room and name it something relevant, like afruitRDoodle.
-
Copy the Invite Link: Once the room is created, you'll get a link to invite guests. You can customize the link if you need specific settings (such as allowing or disallowing guests to hear each other).
-
Capture Scene Link: You’ll also receive a capture link for OBS or another streaming platform.
Step 2: Setting Up the Video Feeds
Now that your room is ready, it's time to set up the video sources. We’ll use a top-down camera, a screen share, and a face cam.
-
Top-Down Camera:
-
Set up a camera over your workspace or desk.
-
Join the VDO.Ninja room using the invite link, selecting your top-down camera as the video source.
-
In the control room, label the video feed as "Top-Down Cam" to keep things organized.
-
Screen Share:
-
Open the VDO.Ninja room in a new tab or window.
-
When joining, select Screen Share instead of a camera.
-
Choose the specific screen or application window you want to share.
-
Label this feed as "Screen Share" in the control room.
-
Face Cam:
-
Use a third device or a separate webcam to set up a face cam.
-
Join the VDO.Ninja room again with this camera, and label it as "Face Cam" in the control room.
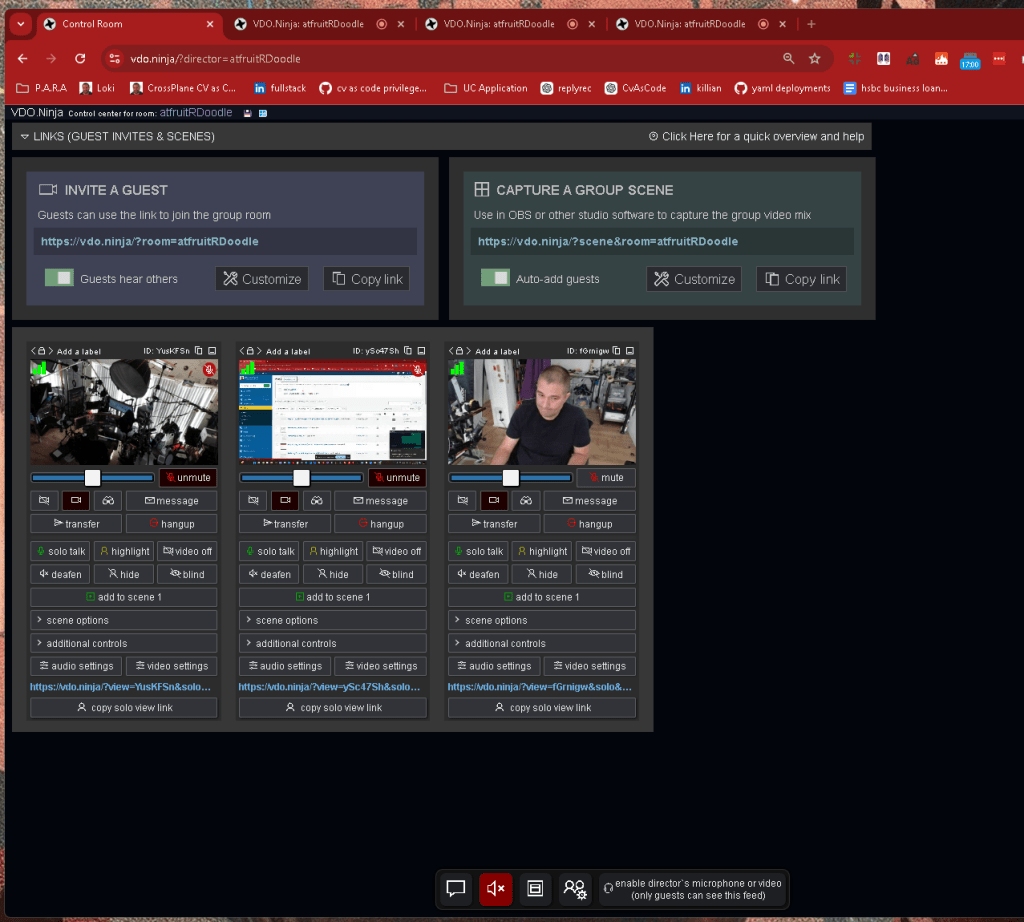
In the control room, you will see all three feeds listed: Top-Down Cam, Screen Share, and Face Cam. You can mute/unmute, hide, or add each one to different scenes depending on what you want your audience to see.
Step 3: Customizing Scenes in the Control Room
The control room is your central hub for managing each video feed. You can create specific scenes to switch between different views or combine all three into one layout.
-
Add to Scene:
-
Select a video feed and click "Add to Scene" to include it in the layout.
-
You can layer the feeds and adjust their positions based on your requirements.
-
Solo Talk & Highlight:
-
Use Solo Talk to highlight a specific feed, such as the face cam when you're addressing the audience directly.
-
You can also use Highlight to focus on one feed temporarily while still showing the others.
-
Mute and Blind:
-
Control who can be heard and what is visible on each stream using the Mute and Blind buttons.
Step 4: Streaming or Recording
Once your video feeds are set up and customized, you can stream your session to any platform via OBS or record it for later use. Simply copy the Scene Link and paste it into your OBS software as a browser source.
- Tip: You can enable your mic or camera as the director (this feed is only visible to guests, which is helpful if you need to give instructions).
Conclusion
VDO.Ninja makes it easy to manage multiple video sources in real time, creating dynamic and professional-looking streams. Whether you're sharing a tutorial, working on a collaborative project, or just need to organize multiple camera angles, this tool gives you the flexibility to manage your session from one place.
Give it a try, and let your creativity flow with this versatile platform!
Let me know if you'd like any adjustments or more details!
Imported from rifaterdemsahin.com · 2024