miro to canva profile
miro
In Canva Whiteboard, you can navigate left and right using the following keyboard shortcuts:
-
Arrow Keys: Use the left and right arrow keys on your keyboard to move the view left or right.
-
Shift + Scroll: Hold the Shift key and use your mouse scroll wheel to move horizontally across the whiteboard.
These shortcuts help you navigate through your Canva Whiteboard easily and efficiently.
hack

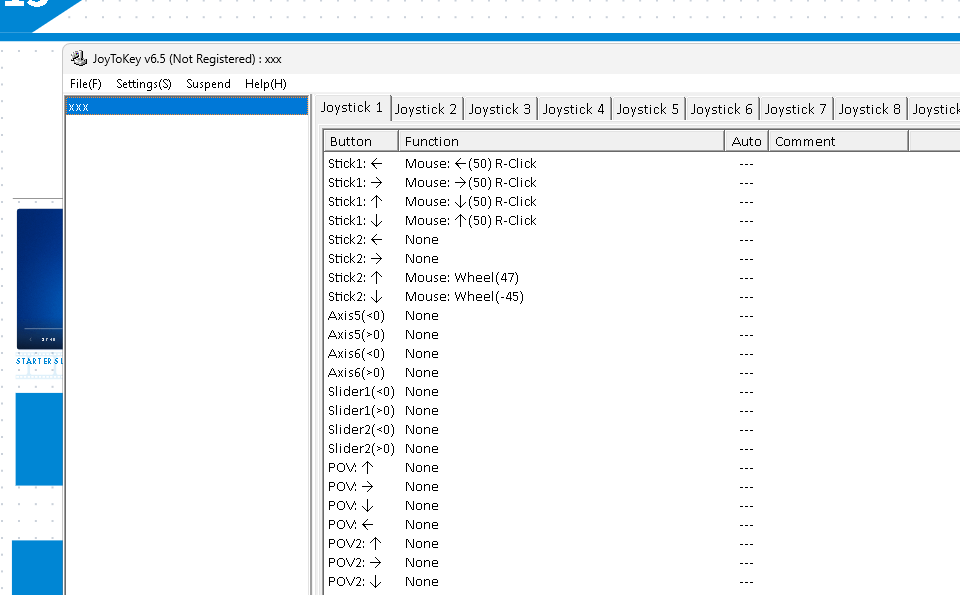
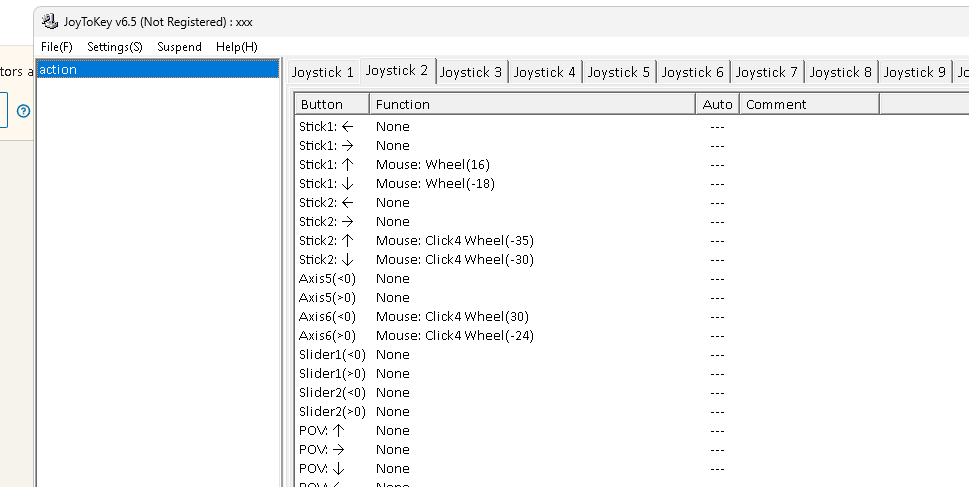
If JoyToKey does not support assigning both keyboard and mouse actions simultaneously to a single button directly, you can use a workaround by assigning the actions to different virtual joystick buttons and then triggering those virtual buttons with the physical button. Here’s a step-by-step guide on how to do it:
-
Open JoyToKey and Create a New Profile:
-
Ensure your controller is connected and open JoyToKey.
-
Create or select a profile for Canva Whiteboard.
-
Assign Shift to a Virtual Button:
-
Select a virtual button that is not physically present on your controller. For instance, use Button 11 (if your controller has fewer than 11 buttons).
-
Assign the Shift key to this virtual button:
Select Button 11.
-
Go to the "Keyboard" tab.
-
Enter "Shift" in the key assignment field.
-
This makes Button 11 act as the Shift key when pressed.
-
Assign Mouse Scroll to Another Virtual Button:
-
Select another virtual button, like Button 12.
-
Assign the mouse scroll action to this virtual button:
Select Button 12.
-
Go to the "Mouse" tab.
-
Assign the vertical wheel action (e.g., Positive for scroll up or Negative for scroll down).
-
Link Physical Button to Virtual Buttons:
-
Select the physical button you want to configure (e.g., Button 1).
-
Assign both virtual buttons to this physical button by using the following method:
In the "Keyboard" tab for Button 1, you can use the combined button press notation to trigger multiple virtual buttons. For example, you can enter Button 11 and Button 12 together in the key assignment field.
-
Alternatively, you can create a macro or sequence in JoyToKey if it supports it:
-
Go to the "Keyboard" tab for Button 1.
-
Click on the "Edit Button Assignment" button (usually a pencil icon).
-
In the button assignment window, create a sequence that first presses Button 11 (Shift) and then Button 12 (Mouse Scroll).
Step-by-Step Configuration:
-
Open JoyToKey and Select Your Profile:
-
Ensure your controller is connected.
-
Select or create a profile for your application (e.g., Canva Whiteboard).
-
Assign Shift to Virtual Button 11:
-
Select Button 11.
-
Go to the "Keyboard" tab.
-
Enter "Shift" in the key assignment field.
-
Assign Mouse Scroll to Virtual Button 12:
-
Select Button 12.
-
Go to the "Mouse" tab.
-
Assign the vertical wheel action (e.g., Positive for scroll up).
-
Link Physical Button to Virtual Buttons:
-
Select Button 1 (or your chosen physical button).
-
Go to the "Keyboard" tab.
-
Enter
Button 11andButton 12in the key assignment field or create a sequence to press both buttons. -
Save the Configuration:
-
Save your configuration in JoyToKey.
-
Test in Canva Whiteboard:
-
Open Canva Whiteboard and test the assigned joystick movement or button to ensure it performs the Shift + Scroll function as expected.
This method effectively combines keyboard and mouse actions using virtual buttons, allowing you to achieve the desired functionality in Canva Whiteboard. If JoyToKey does not natively support this, you may need to look into more advanced mapping software that supports complex macros and sequences.
still the shift did not work
Imported from rifaterdemsahin.com · 2024